한국어Tutorial
GPT-image-2로 AI 액션 피규어 생성하기 — 누구나 박스형 피규어로 바꾸는 법
Crazyrouter API를 통해 GPT-image-2로 초현실적인 박스형 액션 피규어 이미지를 생성하는 방법. 10가지 직업 템플릿과 Python, curl, Node.js 전체 코드 포함.
C
Crazyrouter Team
May 2, 2026 / 155 views
Share:
GPT-image-2로 AI 액션 피규어 생성하기 — 누구나 박스형 피규어로 바꾸는 법#
AI 액션 피규어 트렌드는 소셜 미디어를 완전히 장악했습니다. 개념은 단순합니다. 자기 자신이나 다른 사람을 박스형 액션 피규어로 초현실적으로 만들어내는 거죠. 블리스터 팩, 각종 액세서리, 패키지 문구까지 모두 포함해서 진짜 장난감처럼 보이게 만듭니다.
GPT-image-2는 텍스트 렌더링 능력 덕분에 이 작업에 특히 잘 맞습니다. 패키지 라벨, 태그라인, 바코드까지 실제처럼 자연스럽게 표현할 수 있습니다.
이 글은 GPT-image-2 시리즈의 3편입니다.
결과 미리보기#
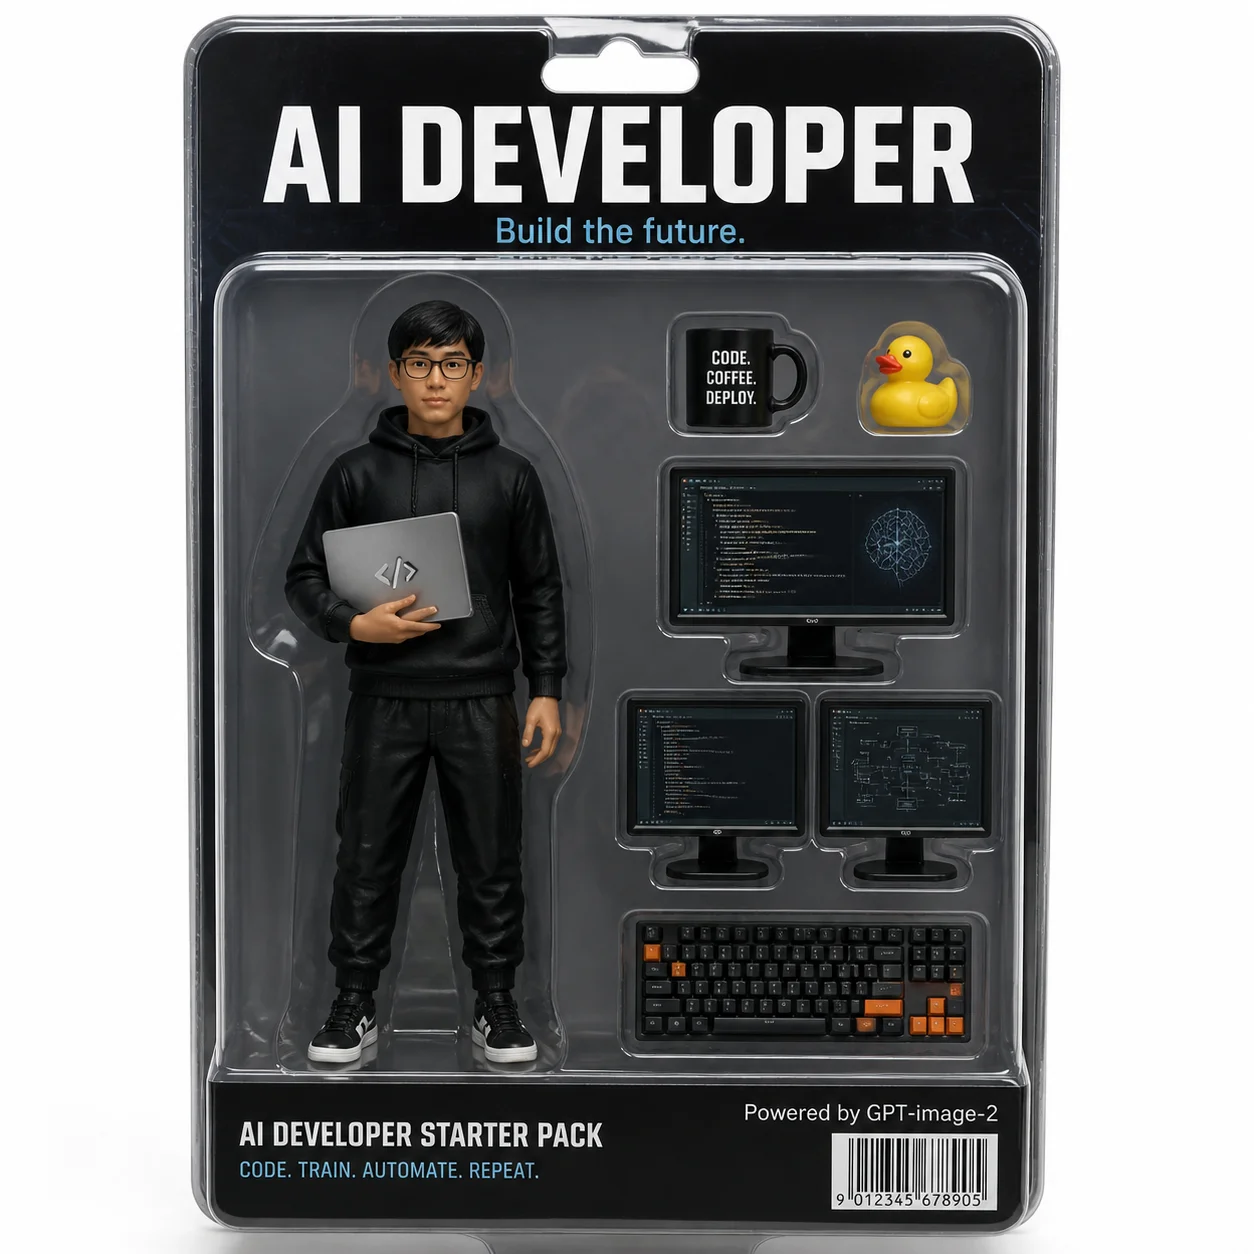
설득력 있게 보이는 이유:
- 투명 블리스터 팩에 사실적인 플라스틱 반사 표현
- 패키지 문구: "AI DEVELOPER — Build the future."가 깔끔하게 렌더링됨
- 액세서리: 커피 머그컵, 러버덕, 듀얼 모니터, 기계식 키보드
- 바코드와 "Powered by GPT-image-2" 작은 문구까지 포함
- 스튜디오 조명으로 전문적인 장난감 사진 느낌 연출
전체 코드#
Python#
python
from openai import OpenAI

client = OpenAI(
    api_key="your-crazyrouter-api-key",
    base_url="https://crazyrouter.com/v1"
)

character_name = "AI DEVELOPER"
tagline = "Build the future."
outfit = "black hoodie, glasses, holding a laptop with code on screen"
accessories = [
    "a coffee mug with 'CODE COFFEE DEPLOY' text",
    "a yellow rubber duck (debugging companion)",
    "two monitors showing code editor and neural network diagrams",
    "a mechanical keyboard with orange accents"
]
bottom_text = "CODE. TRAIN. AUTOMATE. REPEAT."

prompt = f"""
A hyper-realistic product photo of a boxed action figure toy.
The figure is a young Asian male software engineer: {outfit}.

The box is clear plastic blister pack with cardboard backing.
Top of box reads: "{character_name}" in bold letters.
Subtitle: "{tagline}"

Accessories inside the box: {", ".join(accessories)}.

Bottom of box: "{bottom_text}"
Small text: "Powered by GPT-image-2"
Include a realistic barcode.

Studio lighting, white background, professional toy photography style.
"""

response = client.images.generate(
    model="gpt-image-2",
    prompt=prompt,
    size="1024x1024",
    n=1
)

print(f"생성 완료: {response.data[0].url}")
curl#
bash
curl -X POST https://crazyrouter.com/v1/images/generations \
  -H "Content-Type: application/json" \
  -H "Authorization: Bearer your-crazyrouter-api-key" \
  -d '{
    "model": "gpt-image-2",
    "prompt": "Hyper-realistic boxed action figure: AI DEVELOPER. Young engineer in black hoodie and glasses, holding laptop. Clear blister pack with cardboard backing. Accessories: coffee mug, rubber duck, dual monitors, mechanical keyboard. Bottom text: CODE. TRAIN. AUTOMATE. REPEAT. Barcode. Studio lighting, white background, toy photography.",
    "size": "1024x1024",
    "n": 1
  }'
Node.js#
javascript
import OpenAI from "openai";

const client = new OpenAI({
  apiKey: "your-crazyrouter-api-key",
  baseURL: "https://crazyrouter.com/v1",
});

const response = await client.images.generate({
  model: "gpt-image-2",
  prompt: `Hyper-realistic boxed action figure: AI DEVELOPER.
Figure wearing black hoodie, glasses, holding laptop.
Accessories: coffee mug, rubber duck, dual monitors, mechanical keyboard.
Clear blister pack, cardboard backing, barcode.
Studio lighting, white background, toy photography.`,
  size: "1024x1024",
  n: 1,
});

console.log(response.data[0].url);
10가지 직업 템플릿#
바로 쓸 수 있는 템플릿입니다. 값만 바꿔서 사용하면 됩니다:
| # | 직업 | 타이틀 | 복장 | 하단 문구 |
|---|---|---|---|---|
| 1 | 프로덕트 매니저 | PRODUCT MANAGER | 비즈니스 캐주얼, 화이트보드 마커 | SHIP IT. ITERATE. REPEAT. |
| 2 | UI 디자이너 | UI/UX DESIGNER | 터틀넥, Apple Pencil | PIXEL PERFECT. ALWAYS. |
| 3 | 데이터 사이언티스트 | DATA SCIENTIST | 캐주얼 셔츠, Jupyter 노트북 | TRAIN. VALIDATE. DEPLOY. |
| 4 | 스타트업 창업자 | STARTUP FOUNDER | Patagonia 조끼 + 후드티 | MOVE FAST. BREAK THINGS. |
| 5 | 피트니스 코치 | FITNESS COACH | 민소매, 운동화 | NO PAIN. NO GAIN. |
| 6 | 셰프 | MASTER CHEF | 흰색 셰프 코트, 셰프 모자 | TASTE. SEASON. PERFECT. |
| 7 | 사진작가 | PHOTOGRAPHER | 카고 조끼, 카메라 스트랩 | CAPTURE THE MOMENT. |
| 8 | 음악 프로듀서 | MUSIC PRODUCER | 오버사이즈 후드티, 헤드폰 | DROP THE BEAT. |
| 9 | 교사 | TEACHER | 카디건, 안경, 책 | INSPIRE. EDUCATE. EMPOWER. |
| 10 | 집사 | CAT PARENT | 고양이 털이 잔뜩 묻은 스웨터 | OWNED BY CATS SINCE 2020. |
배치 생성#
python
professions = [
    ("AI DEVELOPER", "black hoodie, glasses, laptop"),
    ("DESIGNER", "turtleneck, Apple Pencil, iPad"),
    ("DATA SCIENTIST", "casual shirt, Jupyter notebook"),
]

for title, outfit in professions:
    response = client.images.generate(
        model="gpt-image-2",
        prompt=f"Hyper-realistic boxed action figure: {title}. "
               f"Figure wearing {outfit}. Clear blister pack, "
               f"cardboard backing, studio lighting, toy photography.",
        size="1024x1024",
        n=1
    )
    print(f"{title}: {response.data[0].url}")
프롬프트 팁#
- 짧은 문구가 가장 잘 먹힙니다 — 패키지 문구는 10단어 이하로 유지하세요
- 대문자 표기가 소문자보다 더 안정적으로 렌더링됩니다
- 사실감을 높이려면
studio lighting, soft shadows를 추가하세요 - 진짜 장난감 같은 느낌을 원하면
slight plastic reflection on blister pack를 넣어 보세요
비용#
| 항목 | 가격 (Crazyrouter 기준) |
|---|---|
| 이미지 1장 (1024×1024) | ~$0.04–0.08 |
| 10장 배치 생성 | ~$0.50 |
🚀 Crazyrouter — API 키 하나로 600개 이상의 모델을 사용하세요. GPT-image-2, GPT-5.5, Claude Opus 4.7, DeepSeek V4 등.
Implementation Guides
AuthenticationCreate and use API keys with the required authorization headers.Quick Start GuideMake the first Crazyrouter API call and validate your setup.Image Upload GuidanceUpload local reference images and use temporary public media URLs.IntroductionUnderstand Crazyrouter's all-in-one AI model API gateway.
Topics
Tutorial