OpenClaw Tutorial: Complete Getting Started Guide in 2026
A comprehensive OpenClaw tutorial for beginners covering installation, configuration, and deploying your first AI assistant across WhatsApp, Telegram, and Discord in under 20 minutes with step-by-step instructions.
OpenClaw Tutorial: Complete Getting Started Guide in 2026#
Want to run your own AI assistant across WhatsApp, Telegram, Discord, and 15+ other platforms? This OpenClaw tutorial walks you through setup in under 20 minutes — from zero to your first working AI agent.
What Is OpenClaw and Why Use OpenClaw for AI Assistants#
OpenClaw Overview: Open-Source AI Assistant Runtime#
OpenClaw is an open-source AI assistant runtime platform that lets you deploy a single AI assistant across multiple messaging platforms simultaneously. Unlike cloud-based chatbot builders, OpenClaw runs on your own infrastructure, giving you complete control over your AI assistant's behavior, data, and costs.
Think of OpenClaw as the "operating system" for AI assistants — it handles:
- Message routing across 15+ platforms (WhatsApp, Telegram, Discord, Slack, Signal, iMessage, etc.)
- Context management with intelligent memory and conversation history
- Tool execution for web search, file operations, API calls, and more
- Multi-model support for GPT, Claude, Gemini, DeepSeek, and local models
Why OpenClaw Stands Out Among AI Assistant Platforms#
OpenClaw differentiates itself from alternatives like Dify, Coze, or AutoGPT:
| Feature | OpenClaw | Dify | Coze | AutoGPT |
|---|---|---|---|---|
| Self-hosted | ✅ Single process | ✅ Complex stack | ❌ Cloud only | ✅ Python |
| Multi-platform | 15+ native adapters | Webhook forwarding | Limited | None |
| Memory | Markdown + vector | Vector DB | Cloud | File system |
| Setup time | 20 minutes | 1-2 hours | 5 minutes | 2-3 hours |
| Extensibility | Plugins + Skills | Visual workflow | Marketplace | Code |
OpenClaw's key advantages:
- Native platform support: Direct SDK integration, not webhook forwarding
- Markdown memory: Human-readable, Git-friendly, zero database dependencies
- Single-process architecture: No Redis, PostgreSQL, or message queues required
- Production-ready: Built for 24/7 operation with auto-recovery and monitoring
OpenClaw Use Cases: From Personal Automation to Business Operations#
OpenClaw excels in these scenarios:
Personal Productivity:
- Cross-platform personal assistant (WhatsApp + Telegram + Discord)
- Automated research and information gathering
- Task management and reminders
- Email and calendar automation
Business Automation:
- Customer support across multiple channels
- Lead qualification and routing
- Order tracking and notifications
- Internal team assistance
Development & DevOps:
- CI/CD pipeline monitoring
- Incident response automation
- Code review assistance
- Infrastructure monitoring alerts
OpenClaw Prerequisites and System Requirements#
OpenClaw System Requirements for Different Platforms#
Minimum Requirements:
- CPU: 2 cores (4 cores recommended)
- RAM: 2GB (4GB recommended)
- Storage: 10GB free space
- OS: macOS 12+, Ubuntu 20.04+, Windows 10+ (WSL2), or Docker
Recommended for Production:
- CPU: 4+ cores
- RAM: 8GB+
- Storage: 50GB+ SSD
- Network: Stable internet connection (for AI model APIs)
Supported Platforms:
- macOS (native app + CLI)
- Linux (CLI + Docker)
- Windows (WSL2 + Docker)
- Cloud VPS (AWS, GCP, Azure, DigitalOcean, etc.)
OpenClaw Dependencies: Node.js, npm, and API Keys#
Before installing OpenClaw, ensure you have:
Required:
- Node.js: v18.0.0 or higher
- npm: v9.0.0 or higher (comes with Node.js)
- Git: For cloning repositories and version control
Optional but Recommended:
- Docker: For containerized deployment
- Docker Compose: For multi-container setups
Check your versions:
# Check Node.js version
node --version  # Should show v18.0.0 or higher

# Check npm version
npm --version   # Should show v9.0.0 or higher

# Check Git version
git --version   # Any recent version works
If you need to install Node.js:
# macOS (using Homebrew)
brew install node

# Ubuntu/Debian
curl -fsSL https://deb.nodesource.com/setup_20.x | sudo -E bash -
sudo apt-get install -y nodejs

# Windows (download from nodejs.org)
# Visit https://nodejs.org and download the LTS installer
Choosing Your OpenClaw AI Model Provider#
OpenClaw needs an AI model API to function. You have several options:
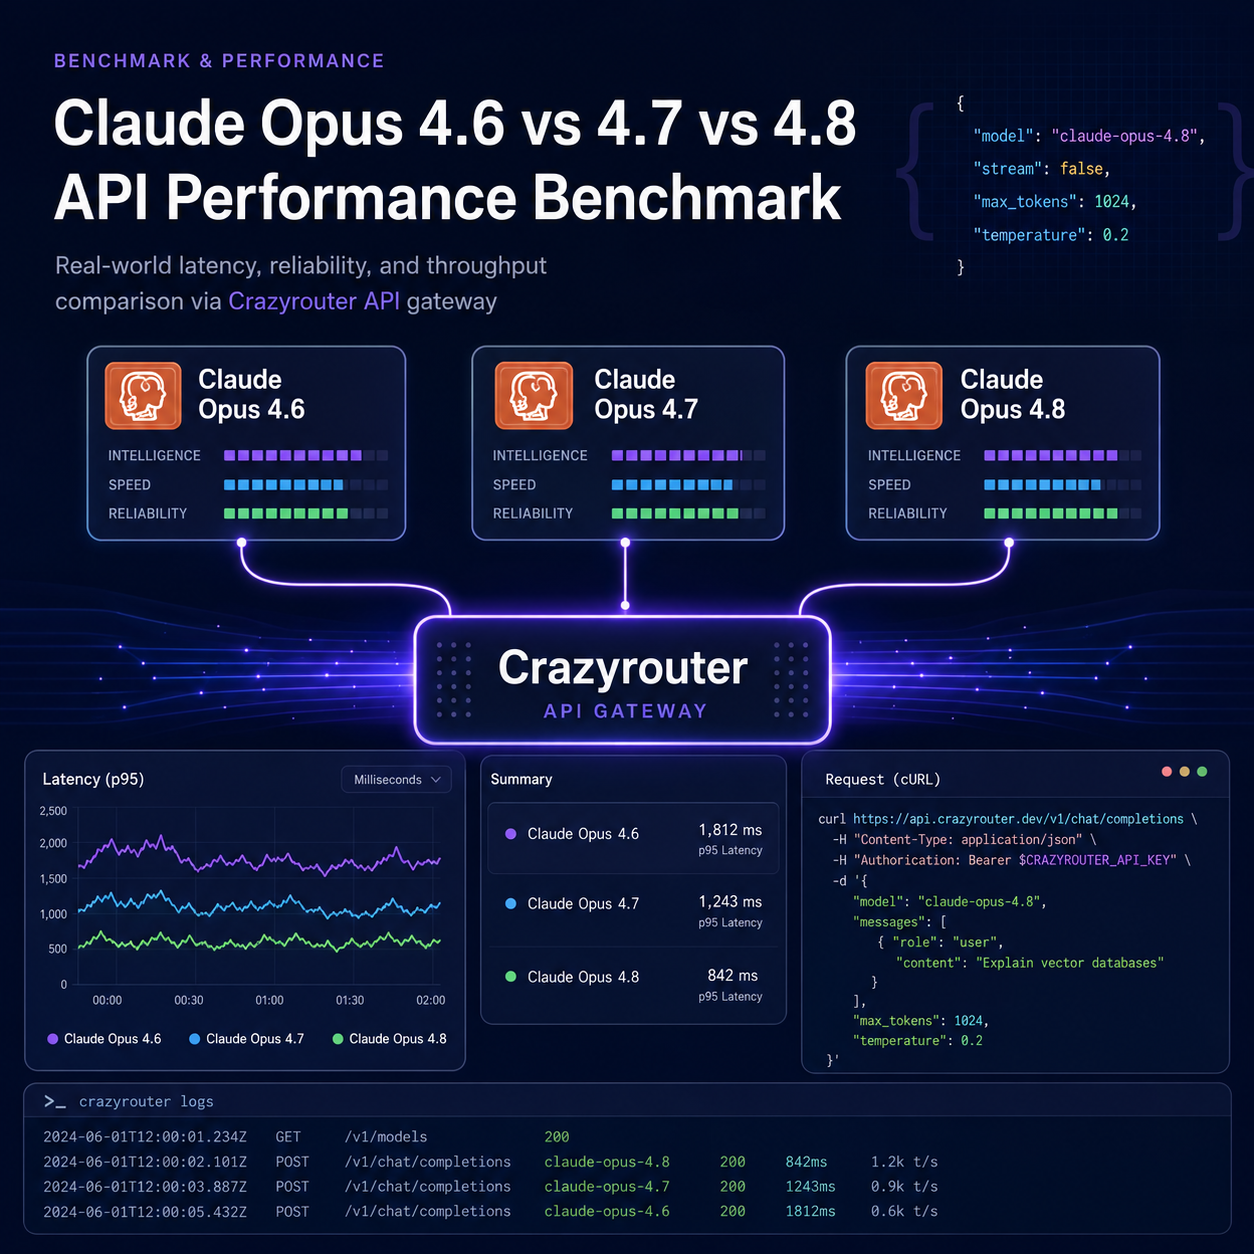
Option 1: Crazyrouter (Recommended)
- Pros: 300+ models, 55% cheaper than direct APIs, unified endpoint, automatic failover
- Pricing: Pay-as-you-go, $0.2 free credits
- Setup: Single API key for all models
- Best for: Production deployments, cost optimization, multi-model strategies
Option 2: Direct Provider APIs
- OpenAI: GPT-4, GPT-5 ($20/month for ChatGPT Plus or pay-per-use)
- Anthropic: Claude 4.6 (pay-per-use, requires API access)
- Google: Gemini 3 (free tier available, then pay-per-use)
Option 3: Local Models
- Ollama: Free, runs locally, requires powerful hardware
- LM Studio: Free, GUI for local models
- Best for: Privacy-sensitive use cases, offline operation
For this OpenClaw tutorial, we'll use Crazyrouter as it provides the best balance of cost, performance, and ease of setup.
OpenClaw Installation: Step-by-Step Setup Guide#
Installing OpenClaw via CLI (Recommended Method)#
The fastest way to get OpenClaw running is via the official CLI installer:
Step 1: Install OpenClaw CLI
# Install OpenClaw globally via npm
npm install -g openclaw

# Verify installation
openclaw --version
Step 2: Run OpenClaw Onboarding Wizard
# Start the interactive setup wizard
openclaw onboard --install-daemon

# The wizard will guide you through:
# 1. Creating a workspace directory
# 2. Configuring AI model provider
# 3. Setting up security tokens
# 4. Choosing messaging platforms
Step 3: Configure AI Model Provider
When prompted for AI provider, select "OpenAI-compatible" and enter:
Base URL: https://crazyrouter.com/v1
API Key: sk-your-crazyrouter-key
Get your Crazyrouter API key:
- Visit Crazyrouter
- Sign up (get $0.2 free credits)
- Navigate to Dashboard → API Keys
- Create a new key
Step 4: Start OpenClaw Gateway
# Start the Gateway (runs in foreground)
openclaw gateway

# Or run as daemon (background)
openclaw gateway --daemon

# Check Gateway status
openclaw gateway status
You should see:
✓ Gateway running on ws://127.0.0.1:18789
✓ HTTP server running on http://127.0.0.1:18789
✓ 0 active sessions
OpenClaw Docker Installation for Containerized Deployment#
For production deployments or isolated environments, use Docker:
Step 1: Create Docker Compose File
Create docker-compose.yml:
version: '3.8'

services:
  openclaw:
    image: openclaw/openclaw:latest
    container_name: openclaw
    restart: unless-stopped
    ports:
      - "18789:18789"
    volumes:
      - ./workspace:/workspace
      - ./config:/config
    environment:
      - OPENCLAW_WORKSPACE=/workspace
      - OPENCLAW_CONFIG=/config/openclaw.json
      - OPENCLAW_GATEWAY_TOKEN=your-secure-token-here
    command: gateway --daemon
Step 2: Create Configuration File
Create config/openclaw.json:
{
  "providers": {
    "openai": {
      "baseUrl": "https://crazyrouter.com/v1",
      "apiKey": "sk-your-crazyrouter-key"
    }
  },
  "agents": {
    "defaults": {
      "model": "gpt-4o",
      "temperature": 0.7
    }
  }
}
Step 3: Start OpenClaw Container
# Start OpenClaw
docker-compose up -d

# Check logs
docker-compose logs -f openclaw

# Check status
docker-compose ps
OpenClaw Installation on macOS, Linux, and Windows#
macOS Native App:
# Download macOS app
curl -L https://github.com/openclaw/openclaw/releases/latest/download/OpenClaw-macOS.dmg -o OpenClaw.dmg

# Install
open OpenClaw.dmg
# Drag OpenClaw to Applications folder

# Launch from Applications or:
open -a OpenClaw
Linux (Ubuntu/Debian):
# Install dependencies
sudo apt-get update
sudo apt-get install -y nodejs npm git

# Install OpenClaw
npm install -g openclaw

# Run onboarding
openclaw onboard --install-daemon
Windows (WSL2):
# Install WSL2 (if not already installed)
wsl --install

# Inside WSL2, follow Linux instructions
sudo apt-get update
sudo apt-get install -y nodejs npm git
npm install -g openclaw
openclaw onboard --install-daemon
Configuring OpenClaw: Essential Settings#
OpenClaw Configuration File Structure#
OpenClaw uses a JSON configuration file located at ~/.openclaw/config.json (or custom path via OPENCLAW_CONFIG).
Basic structure:
{
  "providers": {
    "openai": {
      "baseUrl": "https://crazyrouter.com/v1",
      "apiKey": "sk-your-key"
    }
  },
  "agents": {
    "defaults": {
      "model": "gpt-4o",
      "temperature": 0.7,
      "maxTokens": 4096
    }
  },
  "gateway": {
    "host": "127.0.0.1",
    "port": 18789,
    "token": "your-secure-token"
  },
  "plugins": {
    "slots": {
      "memory": "memory-core",
      "channels": ["whatsapp", "telegram", "discord"]
    }
  }
}
Setting Up OpenClaw AI Model Providers with Crazyrouter#
Crazyrouter provides unified access to 300+ AI models through a single API endpoint. Here's how to configure OpenClaw with Crazyrouter:
Step 1: Get Crazyrouter API Key
- Sign up at Crazyrouter
- Navigate to Dashboard → API Keys
- Create a new key (starts with
sk-)
Step 2: Configure OpenClaw
Edit ~/.openclaw/config.json:
{
  "providers": {
    "openai": {
      "baseUrl": "https://crazyrouter.com/v1",
      "apiKey": "sk-your-crazyrouter-key",
      "models": {
        "default": "gpt-4o",
        "fast": "gpt-4o-mini",
        "smart": "claude-opus-4-6",
        "vision": "gemini-3-pro-vision"
      }
    }
  }
}
Step 3: Test Connection
# Test OpenClaw with Crazyrouter
openclaw test-provider openai

# Expected output:
# ✓ Provider 'openai' connected successfully
# ✓ Model 'gpt-4o' available
# ✓ Response time: 1.2s
Why Use Crazyrouter with OpenClaw:
- Cost savings: 55% cheaper than direct APIs
- Reliability: Automatic failover across multiple upstream providers
- Simplicity: One API key for 300+ models
- Flexibility: Switch models without changing configuration
OpenClaw Gateway Configuration and Security Settings#
Security Best Practices:
- Set Gateway Token (required for remote access):
{
  "gateway": {
    "token": "generate-a-strong-random-token-here"
  }
}
Generate a secure token:
# Generate random token
openssl rand -hex 32
- Restrict Network Access:
{
  "gateway": {
    "host": "127.0.0.1",  // Localhost only
    "port": 18789
  }
}
For remote access, use SSH tunnel:
# From remote machine
ssh -N -L 18789:127.0.0.1:18789 user@your-server
- Enable Device Pairing:
{
  "gateway": {
    "devicePairing": {
      "enabled": true,
      "autoApproveLocal": true,
      "autoApproveRemote": false
    }
  }
}
Configuring OpenClaw to Messaging Platforms#
OpenClaw WhatsApp Integration Setup#
OpenClaw uses the Baileys library for WhatsApp integration (no official API required).
Step 1: Enable WhatsApp Channel
Edit config.json:
{
  "plugins": {
    "channels": {
      "whatsapp": {
        "enabled": true,
        "qrCode": true
      }
    }
  }
}
Step 2: Start Gateway and Scan QR Code
# Start Gateway
openclaw gateway

# Open Web UI
openclaw dashboard

# Navigate to Channels → WhatsApp
# Scan QR code with WhatsApp mobile app
# (Settings → Linked Devices → Link a Device)
Step 3: Test WhatsApp Connection
Send a message to your WhatsApp number:
Hello OpenClaw!
OpenClaw should respond with a greeting.
OpenClaw Telegram Bot Configuration#
Step 1: Create Telegram Bot
- Open Telegram and search for
@BotFather - Send
/newbot - Follow prompts to create bot
- Copy the bot token (looks like
123456:ABC-DEF1234ghIkl-zyx57W2v1u123ew11)
Step 2: Configure OpenClaw
Edit config.json:
{
  "plugins": {
    "channels": {
      "telegram": {
        "enabled": true,
        "token": "123456:ABC-DEF1234ghIkl-zyx57W2v1u123ew11"
      }
    }
  }
}
Step 3: Restart Gateway
# Restart to apply changes
openclaw gateway restart

# Or if running manually:
# Ctrl+C to stop, then:
openclaw gateway
Step 4: Test Telegram Bot
- Search for your bot in Telegram
- Send
/start - Send a message like "Hello!"
OpenClaw Discord Integration Guide#
Step 1: Create Discord Bot
- Visit Discord Developer Portal
- Click "New Application"
- Go to "Bot" tab → "Add Bot"
- Copy bot token
- Enable "Message Content Intent"
Step 2: Invite Bot to Server
- Go to "OAuth2" → "URL Generator"
- Select scopes:
bot,applications.commands - Select permissions:
Send Messages,Read Message History,Use Slash Commands - Copy generated URL and open in browser
- Select server and authorize
Step 3: Configure OpenClaw
Edit config.json:
{
  "plugins": {
    "channels": {
      "discord": {
        "enabled": true,
        "token": "your-discord-bot-token"
      }
    }
  }
}
Step 4: Test Discord Bot
In your Discord server:
@YourBot hello!
Your First OpenClaw AI Assistant#
Creating Your First OpenClaw Session#
Once OpenClaw is running and connected to at least one messaging platform, you can start interacting:
Via Web UI:
# Open OpenClaw dashboard
openclaw dashboard

# Browser opens at http://localhost:18789
In the dashboard:
- Click "New Session"
- Select a channel (WhatsApp, Telegram, Discord)
- Start chatting!
Via Messaging Platform:
Simply send a message to your connected bot on WhatsApp, Telegram, or Discord.
OpenClaw Commands and Basic Interactions#
OpenClaw supports various commands:
Basic Commands:
/help           - Show available commands
/status         - Show OpenClaw status
/models         - List available AI models
/switch <model> - Switch to different model
/clear          - Clear conversation history
/memory         - Show memory summary
Tool Commands:
/search <query>     - Web search
/fetch <url>        - Fetch webpage content
/exec <command>     - Run shell command (if enabled)
/file <path>        - Read file
Example Interactions:
You: What's the weather in Tokyo?
OpenClaw: [Searches web] The current weather in Tokyo is...

You: /switch claude-opus-4-6
OpenClaw: Switched to model: claude-opus-4-6

You: Explain quantum computing
OpenClaw: [Using Claude] Quantum computing is...
Testing OpenClaw AI Responses Across Platforms#
Test OpenClaw's multi-platform capabilities:
Test 1: Cross-Platform Memory
- Send message on WhatsApp: "Remember my favorite color is blue"
- Send message on Telegram: "What's my favorite color?"
- OpenClaw should remember across platforms
Test 2: Tool Execution
You: Search for "OpenClaw GitHub repository"
OpenClaw: [Executes web_search tool]
Found: https://github.com/openclaw/openclaw
Test 3: Multi-Model Comparison
You: /switch gpt-4o
You: Explain AI in one sentence
OpenClaw: [GPT-4o response]

You: /switch claude-opus-4-6
You: Explain AI in one sentence
OpenClaw: [Claude response]

OpenClaw Troubleshooting Common Issues#
OpenClaw Connection Problems and Solutions#
Issue: Gateway won't start
# Check if port is already in use
lsof -i :18789

# Kill existing process
kill -9 <PID>

# Or use different port
openclaw gateway --port 18790
Issue: Can't connect to Gateway
# Check Gateway status
openclaw gateway status

# Check logs
tail -f ~/.openclaw/logs/gateway.log

# Verify firewall settings
sudo ufw allow 18789  # Ubuntu
Issue: WhatsApp QR code not appearing
# Clear WhatsApp session
rm -rf ~/.openclaw/sessions/whatsapp

# Restart Gateway
openclaw gateway restart
OpenClaw API Key Errors and Fixes#
Issue: "Invalid API key" error
- Verify API key in config:
cat ~/.openclaw/config.json | grep apiKey
- Test API key directly:
curl -X POST https://crazyrouter.com/v1/chat/completions \
  -H "Authorization: Bearer sk-your-key" \
  -H "Content-Type: application/json" \
  -d '{"model":"gpt-4o-mini","messages":[{"role":"user","content":"test"}]}'
- Regenerate key at Crazyrouter Dashboard
Issue: "Rate limit exceeded"
- Check your Crazyrouter usage at Dashboard
- Upgrade plan or add credits
- Implement request throttling in config:
{
  "agents": {
    "defaults": {
      "rateLimits": {
        "requestsPerMinute": 20
      }
    }
  }
}
OpenClaw Performance Optimization Tips#
1. Enable Response Caching:
{
  "agents": {
    "defaults": {
      "cache": {
        "enabled": true,
        "ttl": 3600
      }
    }
  }
}
2. Optimize Context Window:
{
  "agents": {
    "defaults": {
      "maxTokens": 2048,  // Reduce for faster responses
      "compaction": {
        "enabled": true,
        "threshold": 0.8
      }
    }
  }
}
3. Use Faster Models:
{
  "providers": {
    "openai": {
      "models": {
        "default": "gpt-4o-mini",  // Faster and cheaper
        "smart": "gpt-4o"           // Use only when needed
      }
    }
  }
}
4. Monitor Resource Usage:
# Check OpenClaw resource usage
openclaw stats

# Monitor in real-time
watch -n 1 openclaw stats
OpenClaw Pricing and Cost Optimization#
OpenClaw Open-Source Licensing#
OpenClaw itself is completely free and open-source under the MIT license. You can:
- Use it for personal or commercial projects
- Modify the source code
- Deploy unlimited instances
- No licensing fees or restrictions
AI Model API Costs with OpenClaw#
The main cost of running OpenClaw is AI model API usage. Typical costs:
Direct Provider Pricing:
- GPT-4o: 10/1M output tokens
- Claude Opus 4.6: 75/1M output
- Gemini 3 Pro: 5/1M output
Example Monthly Costs (1000 messages/day):
- Light usage (short messages): $50-100/month
- Medium usage (conversations): $150-300/month
- Heavy usage (long contexts): $500-1000/month
Reducing OpenClaw Operating Costs with Crazyrouter#
Crazyrouter offers 55% cost savings compared to direct APIs:
Crazyrouter Pricing:
- GPT-4o: 4.50/1M output (55% off)
- Claude Opus 4.6: 33.75/1M output (55% off)
- Gemini 3 Pro: 2.25/1M output (55% off)
Cost Comparison (1000 messages/day):
| Provider | Direct API | Crazyrouter | Savings |
|---|---|---|---|
| GPT-4o | $150/mo | $68/mo | $82/mo (55%) |
| Claude Opus | $450/mo | $203/mo | $247/mo (55%) |
| Gemini 3 Pro | $75/mo | $34/mo | $41/mo (55%) |
Additional Crazyrouter Benefits:
- No minimum commitment
- Pay-as-you-go pricing
- $0.2 free credits to start
- Automatic failover (no downtime costs)
- Unified billing across all models
Ready to deploy your OpenClaw AI assistant? Crazyrouter provides unified API access to 300+ AI models with 55% cost savings. Check our pricing to find the best plan for your OpenClaw deployment.
Related Articles:
- OpenClaw Architecture: How It Works Under the Hood
- OpenClaw Applications: 10+ Real-World Use Cases
- OpenClaw Skills Development Guide
Resources:
- OpenClaw Documentation: https://docs.openclaw.ai
- OpenClaw GitHub: https://github.com/openclaw/openclaw
- OpenClaw Community Discord: https://discord.com/invite/clawd
- Crazyrouter Dashboard: https://crazyrouter.com/dashboard