 简体中文
简体中文 繁體中文
繁體中文 English
 Français
 Русский
 日本語
日本語 Tiếng Việt
 한국어
한국어 Deutsch
 Español
 Italiano
 Português
 العربية
 ไทย
ไทย Bahasa Indonesia
 Bahasa Melayu
 Türkçe
 Polski
 Nederlands
 Dansk
Dansk Norsk
Norsk Қазақша
Crazyrouter User Guide: From Registration and API Keys to Chat and Image Generation
Learn Crazyrouter registration, API keys, wallet checks, browser chat, image generation, and coding-tool setup with eight interface screenshots and practical troubleshooting advice.
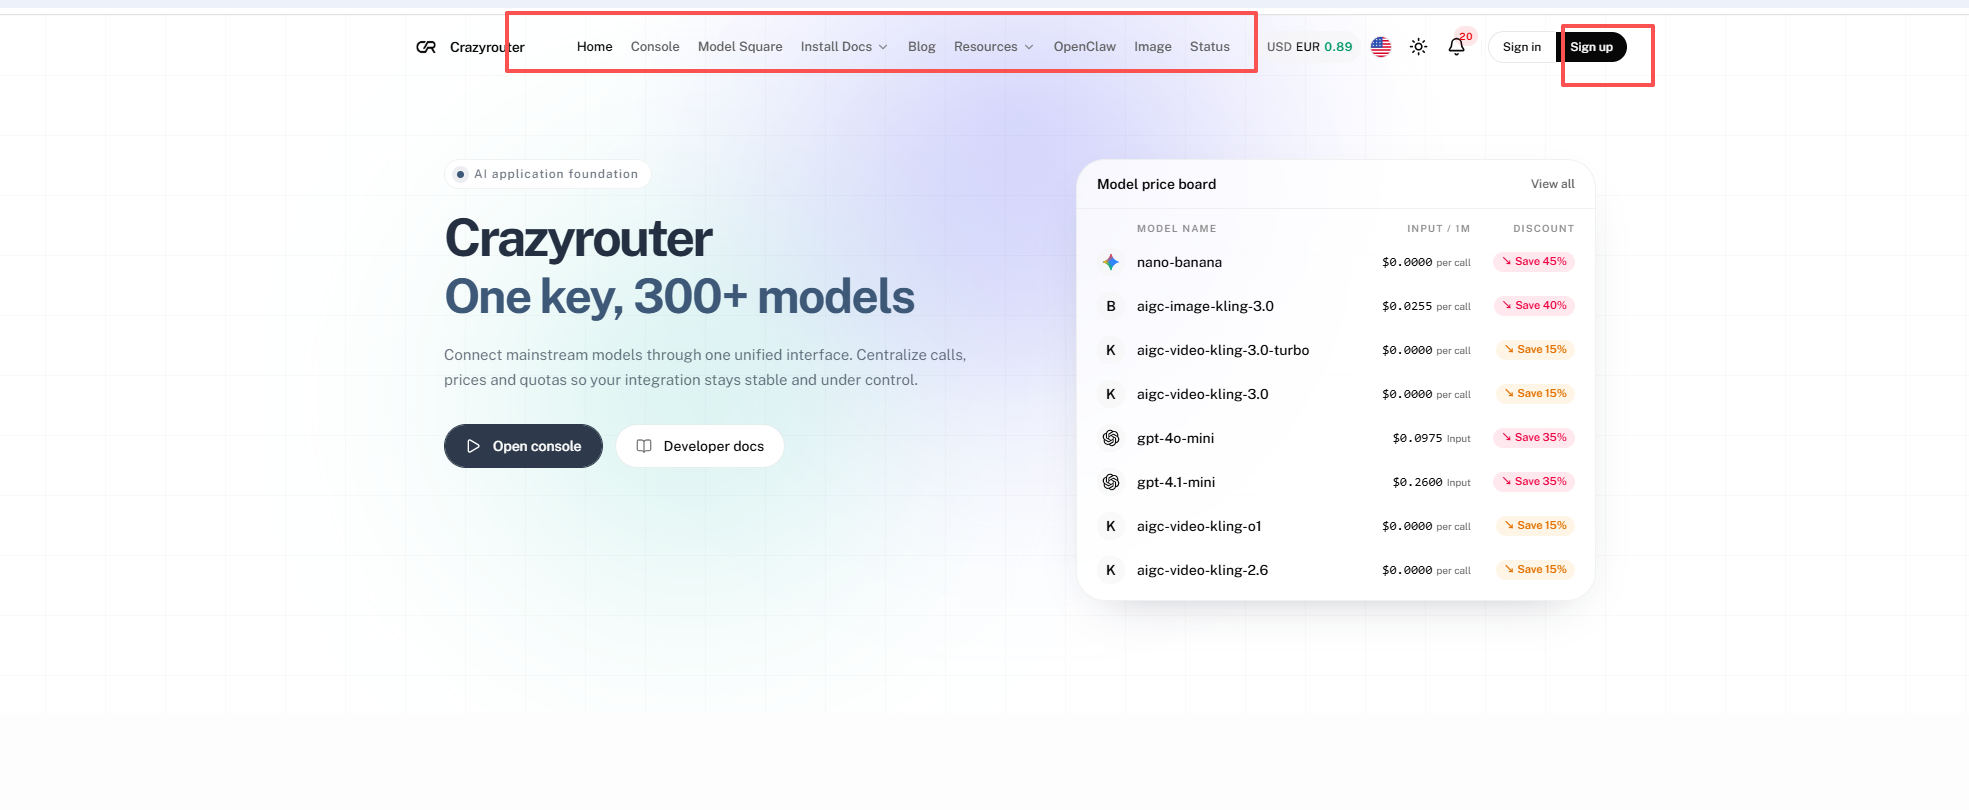
Crazyrouter User Guide: From Registration and API Keys to Chat and Image Generation#
To start using Crazyrouter, create an account, choose a model, check your balance and access settings, then try a small task. This Crazyrouter guide covers seven steps: registration, model selection, API keys, wallet, browser chat, image generation, and coding-tool setup. You can follow the browser sections before connecting an application.
This is a Crazyrouter product guide based on interface screenshots collected in October 2026. Screenshots retain their original interface language; the captions explain what to look for. Model availability, prices, payment methods, and button positions can change. The example image output is from the supplied screenshot, not a new generation test.
Understand your account, API key, and balance#
Your account signs you into the website. An API key identifies requests from an application. Your balance pays for applicable usage. Creating an account does not add funds, and creating a key does not remove usage charges.
| What you need | Interface entry | What to check |
|---|---|---|
| Choose a model | Model Square | Task, API format, billing unit |
| Chat in your browser | Playground | Selected model, prompt, response |
| Connect an application | API Keys | Status, allowance, model access, expiry |
| Check funds | Wallet | Balance, payment options, credited amount |
| Investigate a request | Usage Logs | Request, usage, charge |
| Configure a coding tool | Install Docs | Instructions for your specific tool |
Model access also depends on account permissions, key restrictions, and current availability. Follow the configuration instructions for the tool you actually use.
Step 1: Register and verify your account#
Open the Crazyrouter registration page and check that the main domain in your address bar is crazyrouter.com.
- Enter a username and password, then confirm the password.
- Enter an email address you can access. Select Send code and enter the verification code.
- Complete the Cloudflare verification when prompted.
- Read the user agreement and privacy policy, then select the relevant checkbox if you agree.
- Review the required fields and select Create account.
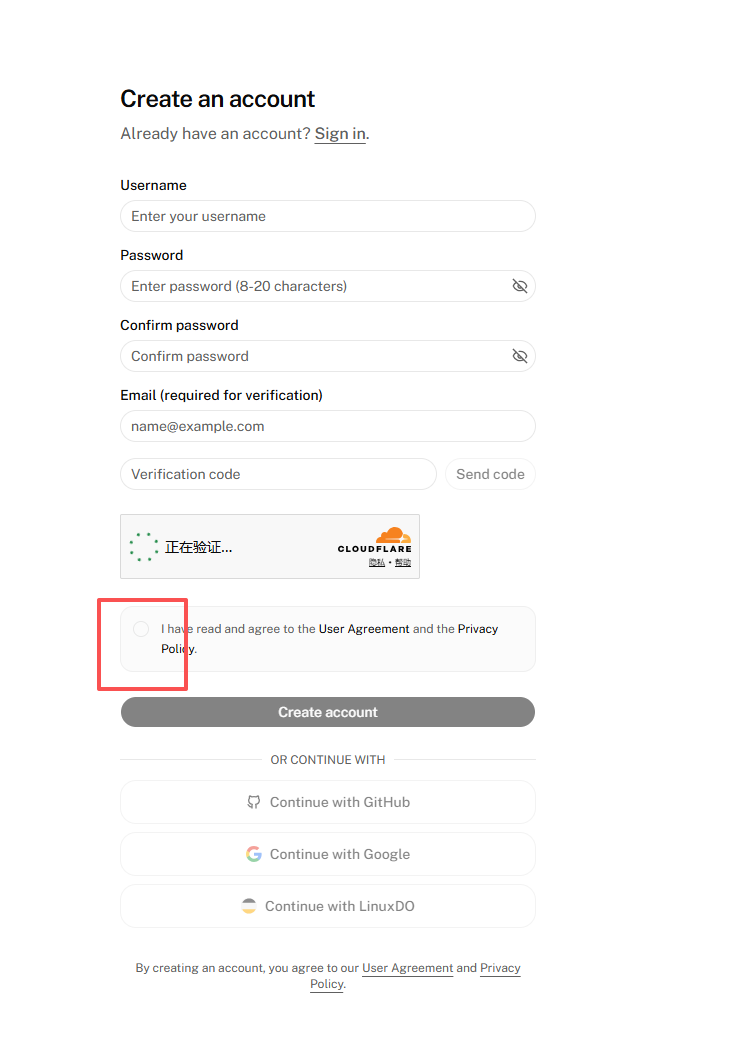
The red outline marks the agreement checkbox. Password requirements are shown in the form. The screenshot also shows GitHub, Google, and LinuxDO sign-in options; use the options available on the current page.
If the button is unavailable, check all required fields, matching passwords, the email code, human verification, and the agreement checkbox. The checkbox is only one possible cause.
Step 2: Choose a model and understand its billing#
Open Model Square and narrow the list by provider, task, or API type. Start with one model that fits your task. The count in a screenshot is a snapshot of the list and its filters, not a permanent platform total.
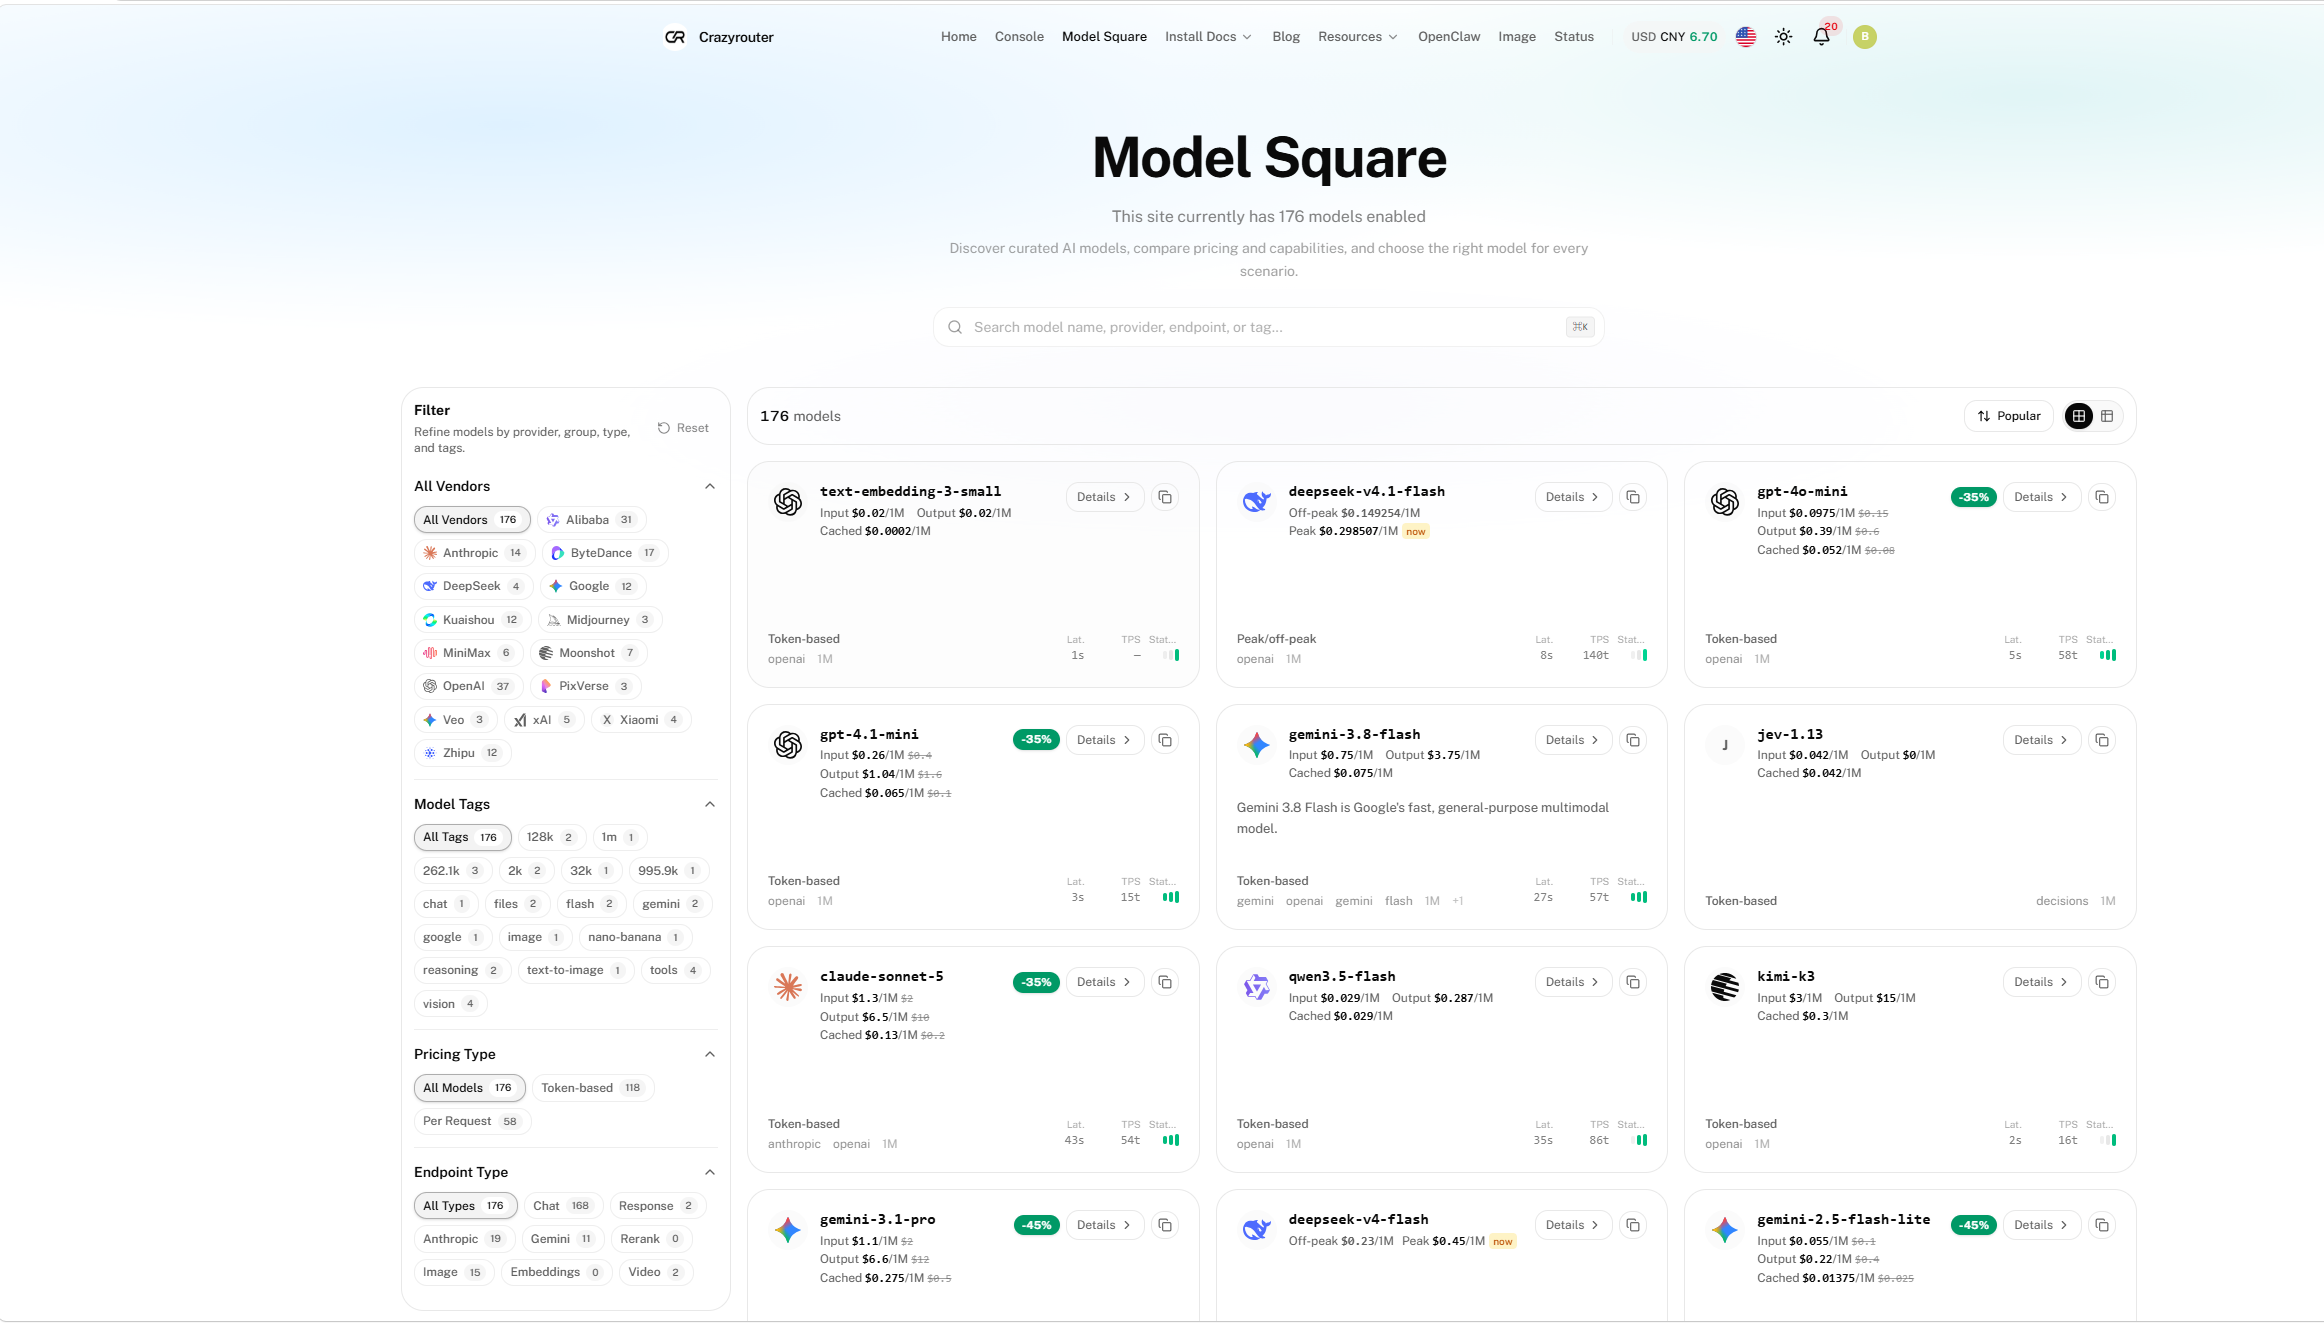
| Pricing detail | Meaning | Before you use it |
|---|---|---|
| Input and output tokens | Input and generated text may have different rates | Check the unit, such as per million tokens |
| Cache pricing | Some models bill cache reads and writes differently | Do not apply the cache rate to all input |
| Per-task or media pricing | Charges may depend on requests, images, duration, or other units | Check size, quantity, and duration settings |
Use the Crazyrouter pricing comparison to check current rates. Confirm what the model does, which API it uses, and how it is billed before sending a request.
Step 3: Create an API key and check its scope#
In the console, open API Keys and create a key. Give it a recognizable name, such as “Development” or “Personal testing.” Separate keys make it easier to manage different applications.

The key in the screenshot is masked. Copy the full key through the interface when configuring a tool; text containing asterisks is not a usable credential.
Check that the key is enabled, has a sufficient allowance, permits the target model and IP address, and has not expired. The key allowance and account balance are separate checks. An unlimited key allowance does not mean an unlimited account balance. Store keys in a password manager or the application's secure configuration, never in public screenshots, repositories, or browser-side source code.
Step 4: Check your wallet and add funds if needed#
Open Wallet. The balance, accumulated usage, and request count belong to the signed-in account. The displayed amounts and recharge options are examples from the captured interface, not default balances for new users.
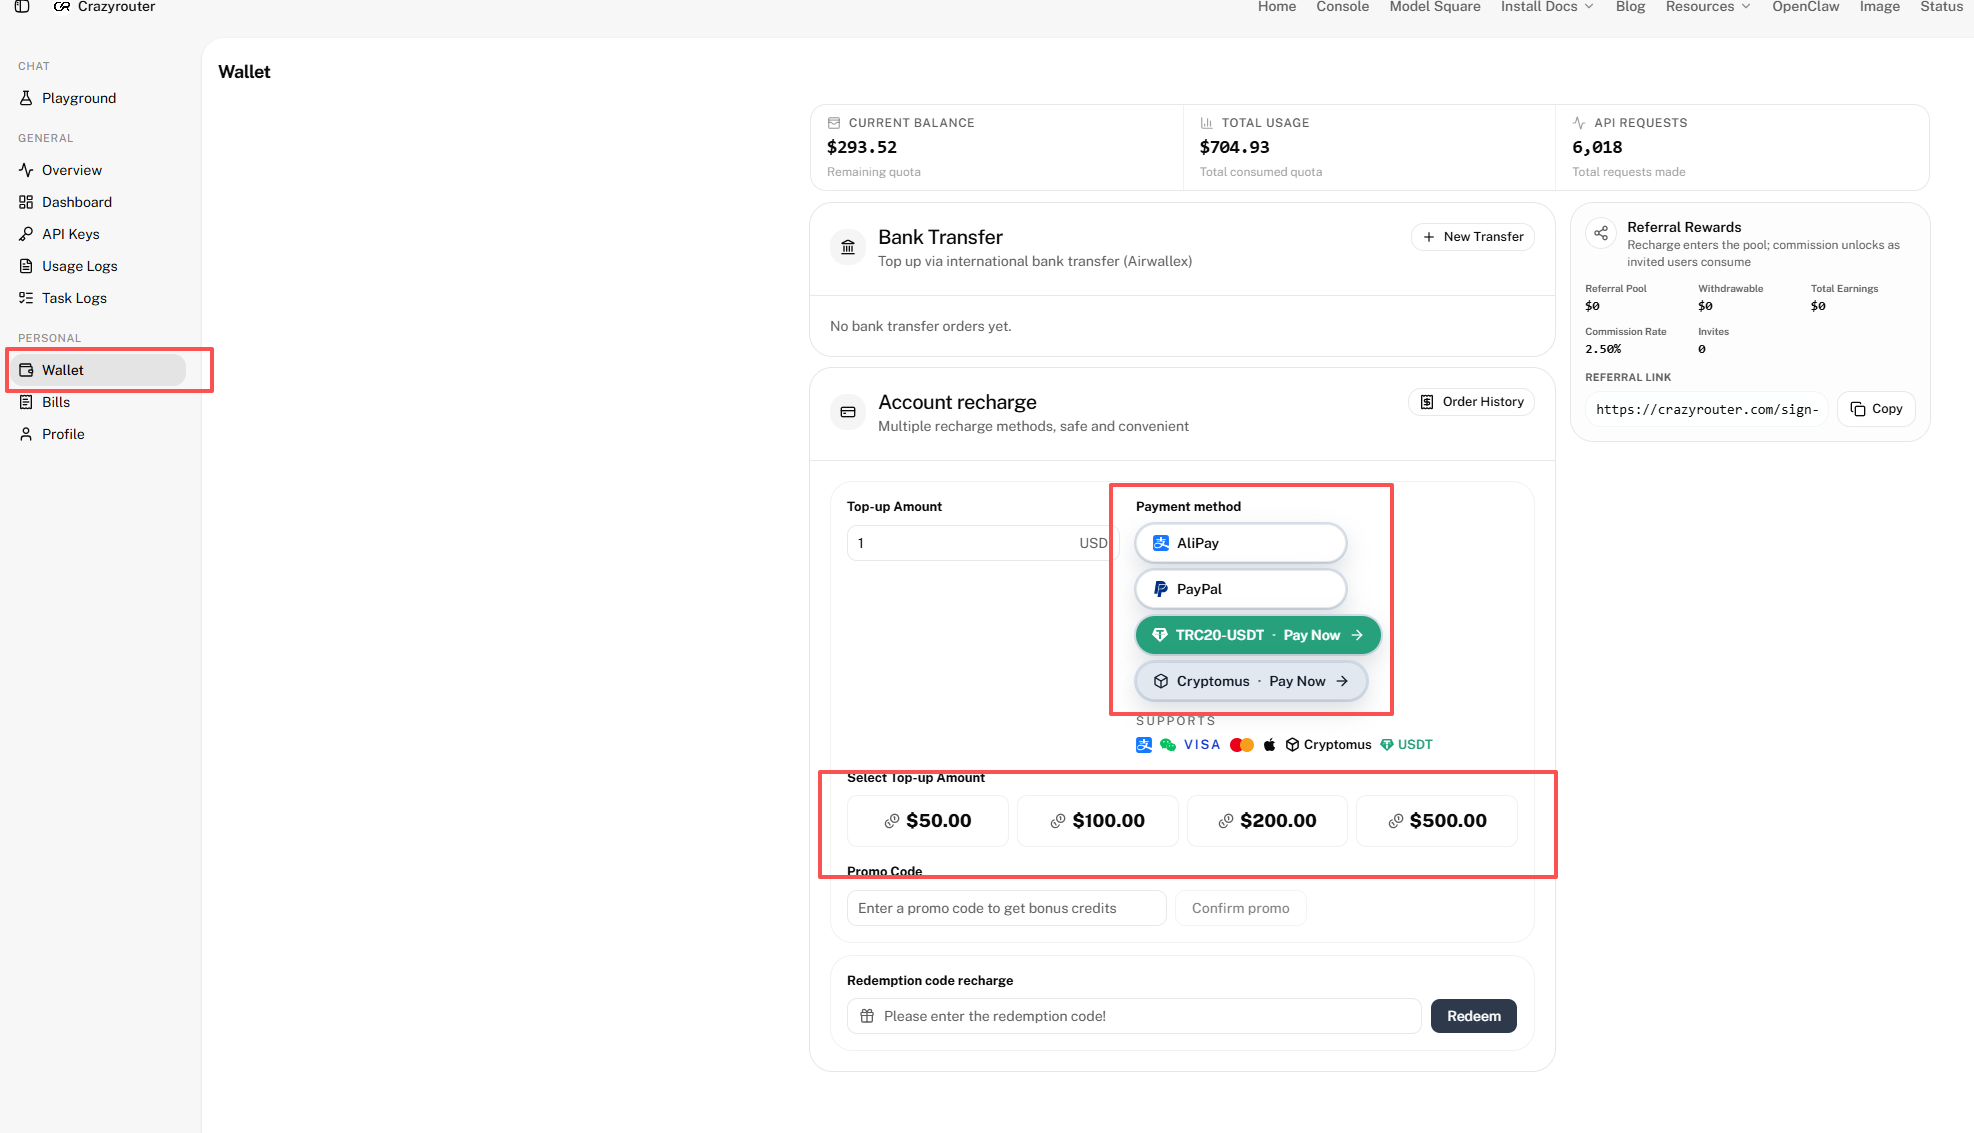
The screenshot includes AliPay, PayPal, TRC20-USDT, and Cryptomus entries. A payment logo does not guarantee that the method is available for every region or order. Check the actual checkout page, minimum payment, settlement currency, amount due, and credited amount.
After paying, confirm the order status and wallet balance before sending requests. If credit is delayed, inspect the existing order before paying again.
Step 5: Try a small conversation in Playground#
Open Playground, select an available text model, and enter a short, clear prompt. For example:
Explain an API to a programming beginner in three sentences. Keep each sentence under 20 words.
This is a suggested exercise, not a reported model-test result.
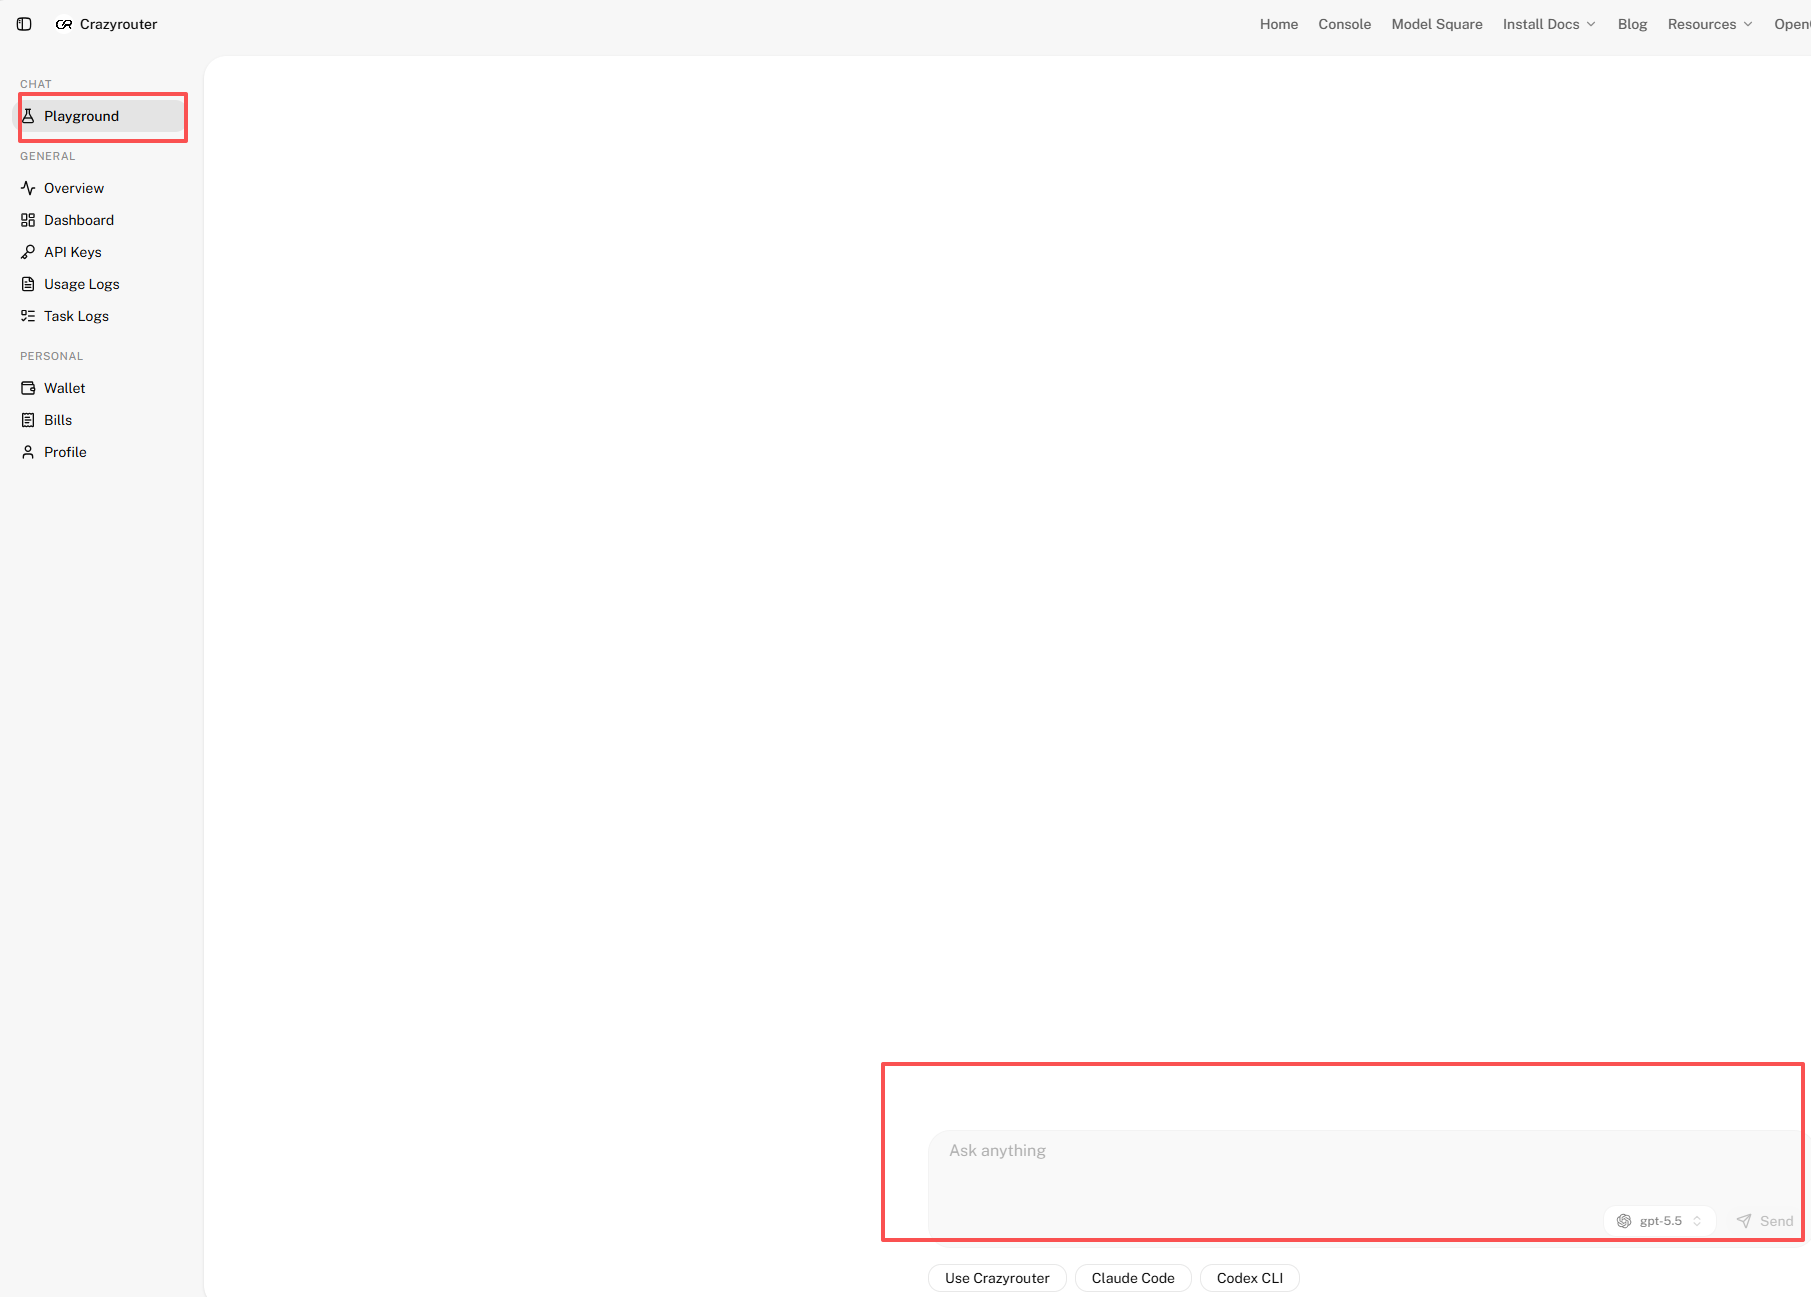
Check that the reply is complete, then look for the corresponding request and charge in Usage Logs. Browser use may incur charges too. If a request fails, keep the error message and check the balance, model, and permissions. Support can use a request time or request ID; do not send your full API key.
Step 6: Use the image workspace#
Open the Image entry. In the supplied screenshot, request settings are on the left and the output preview is on the right.
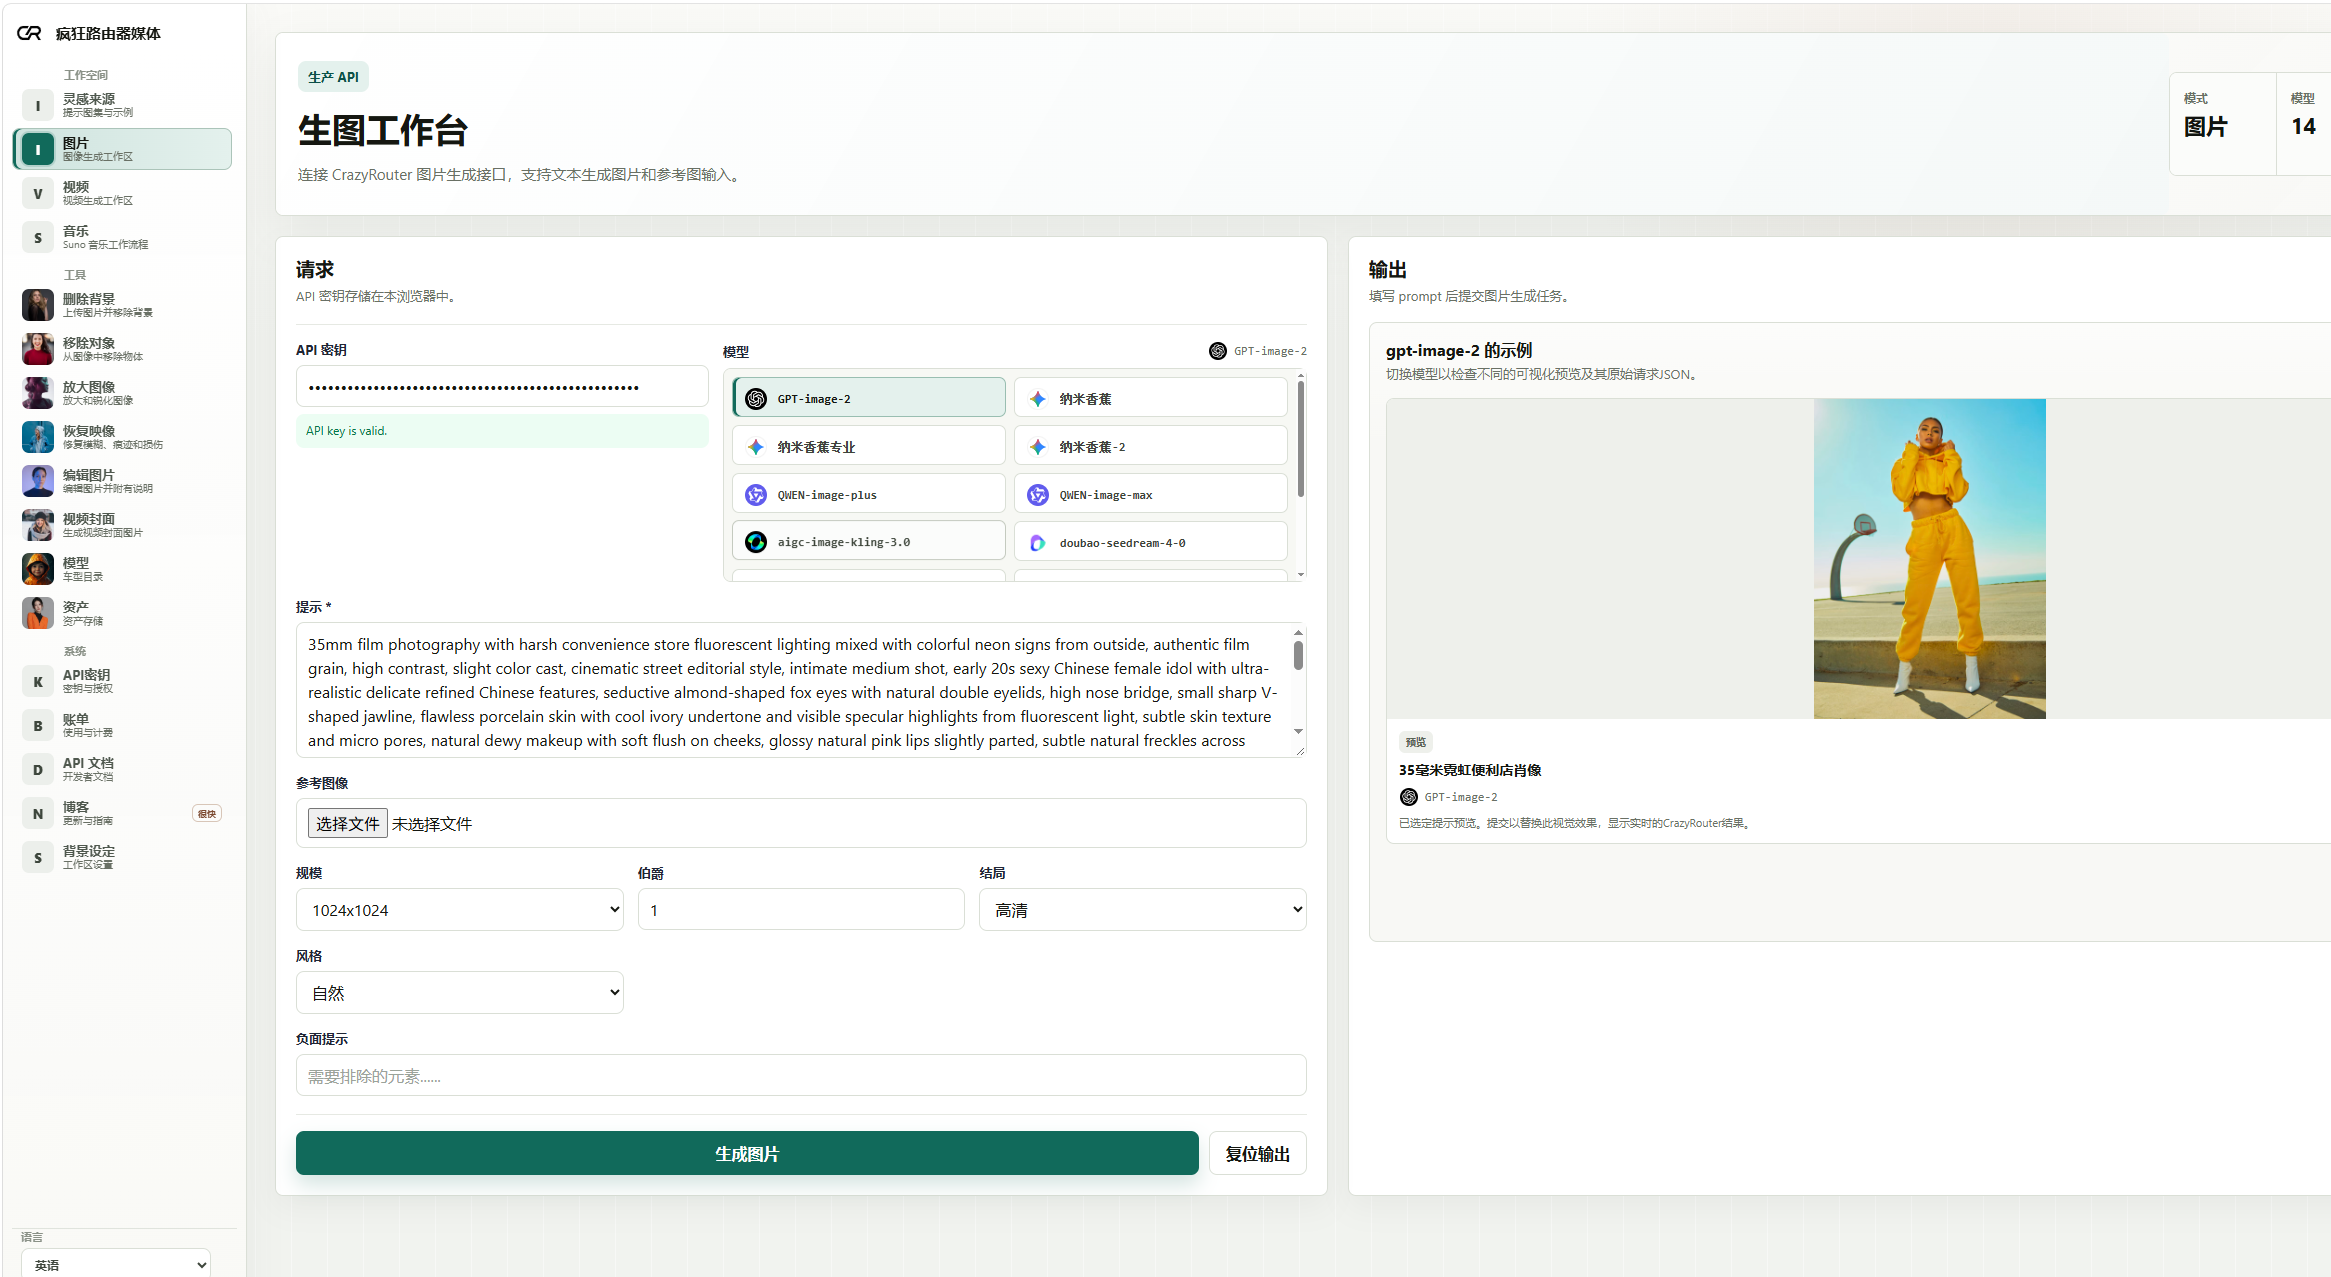
Configure a key if requested, select an image model, and describe a subject, setting, and visual style. Add a reference image only when the selected model and workflow support it. Available size, quantity, and quality settings depend on the model.
Start generation and wait for the final task result before checking or downloading the output. A valid key, an accepted request, and a completed image are three different states. An in-progress task still needs a final result. For programmatic integration, consult that model's documentation; image models do not all share identical parameters or endpoints.
Step 7: Connect Claude Code or Codex#
Open Install Docs. The screenshot shows API Reference, Integrations, and shortcuts for Claude Code and Codex.
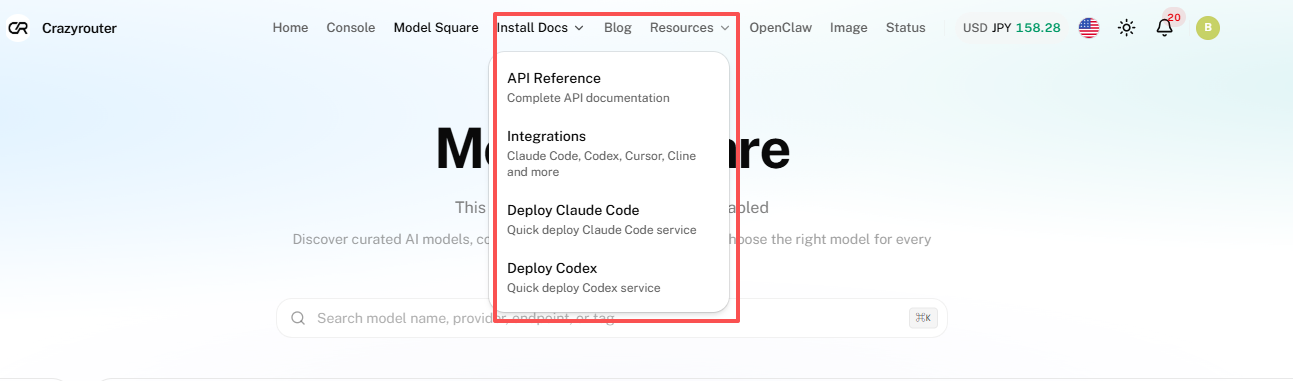
Choose the instructions for your tool. For Codex, follow the Crazyrouter Codex setup guide. For Claude Code, select its separate guide from the same menu. Check the instructions and any configuration script before running it.
Enter the required API address, key, and model name. Different tools may expect different protocols or address formats. Run a small task first and confirm the response before using the configuration for regular work. Use API Reference when you need endpoint details.
Frequently asked questions#
Does registration automatically provide access to every model?#
No. Registration, account balance, any account-specific allowance, and model permissions are separate. Check your account's current conditions and the model's availability.
Why does the model count differ between the home page and Model Square?#
The pages may use different counting methods. Filters, permissions, and models being added or removed can also change the visible list. Check the individual model rather than assuming the screenshot count applies to your account.
Is an API key the same as my password?#
No. Your password signs you into the account; an API key identifies application requests. Use the full key from API Keys when configuring a tool.
Why does a request fail when my wallet has funds?#
Possible causes include the key allowance, expiry, model permissions, IP restrictions, incorrect API configuration, or temporary model unavailability. Start with the error message and usage log.
Can I use every payment method shown in the screenshot?#
Not necessarily. Availability, minimum amounts, and settlement currencies are determined by the checkout page for your current order.
Can I use Crazyrouter without writing code?#
You can begin with chat in Playground or an image task in the image workspace. Use API documentation when connecting an application and the relevant integration guide when connecting a coding tool.
My image key is valid, but there is no output. What should I check?#
Key validation only checks the credential. Also check funds, permissions, parameters, and task status. The workflow is complete only when the task finishes and its output can be opened.